Building a Multi-node Environment with Cilium and K3s in Twenty Minutes or Less

Like many of you, we have been feeling the pains of working remotely from home. We are living in a difficult time where many of us have limited access to resources. Still, the need to design, build and maintain moves on! For many of us, it is what keeps us mentally strong on a daily basis right now. This means we still need to test and optimize our applications. But how can we reliably test a complex application and ensure the network policies are properly enforced across the entire communications path?
Thanks to our friends at Rancher Labs and their amazing solution for kubernetes on edge and IoT devices K3s it is not only possible, but easy to do. With Cilium and K3s you can build a multi-node Kubernetes cluster with just 8GB of memory and a modern CPU in just minutes. A multi-node cluster can help with testing of complex application architectures and is especially useful when diagnosing or troubleshooting network policies. Whether you just want to take Cilium for a test drive or you want to start designing tight network controls into your application, this post is for you!
In this guide, we will walk through the steps required to build a multi-node Kubernetes cluster on your local workstation or laptop using K3s and Cilium. Then we'll show you how you can use Hubble to inspect traffic in the cluster and visualize data which is exposed by the superpowers of eBPF and Cilium. We will also show you how to restrict the flow of traffic between applications. Finally, we will see how Cilium and Hubble can provide you detailed information which can help solve problems related to compliance and regulatory concerns.
Pre-Requisites
- Vagrant: HashiCorp Vagrant is useful for building local development environments. It's free to install and use. This guide will use it with VirtualBox, but vagrant can also be used with a number of other providers.
- VirtualBox: VirtualBox is a virtualization
platform freely distributed for personal use. In order to run
the virtual machines in this post VirtualBox 6.1. or higher is required. To
check if you have the correct version of VirtualBox, run the following at a
terminal prompt:
vboxmanage --version - Helm: Helm version 3 is required to install Cilium and
Hubble. To determine if you have Helm version 3 you can run the following
command at a terminal prompt:
helm version - Git: Code examples are available via GitHub —and may be downloaded using Git—but are not required. I have provided all of the necessary code bits here in the post to follow along, but if you want to customize your environment beyond this post I recommend cloning the repository.
- kubectl - Kubernetes CLI
used for interacting with the kubernetes api. We will be installing version
1.17.4 of kubernetes, so we should install the same version or newer.
To check the version installed type
kubectl version. Your system should report the version installed for both Client and Server. If your connection to the server fails, this is expected without a server running.
Starting Your Environment
Clone the repository:
git clone https://github.com/seanmwinn/cilium-k3s-demo.git
cd cilium-k3s-demo
The guest machines will require the Virtualbox Guest Additions installed. In
order to allow vagrant to automatically install the guest additions on boxes
which do not implement it, install the vagrant-vbguest plugin:
vagrant plugin install vagrant-vbguestBy default, the included Vagrantfile will start a cluster with one K3S master node
and one K3S agent node by default. You can change the number of agent nodes by
configuring an environment variable for K3S_AGENTS or passing it with the
command as a prefix:
vagrant upAfter about 5-10 minutes depending on your download spped, the machines should
be started and K3s should be installed and running. The provisioning script
will copy a k3s.yaml file to your working directory. Verify that kubectl can
communicate with the kubernetes master. It is expected to see pods in a
Pending state:
export KUBECONFIG=$PWD/k3s.yaml
kubectl get pods -n kube-system -o wide
Installing Cilium
Cilium is installed using Helm version 3. First, add the Cilium repository to your helm configuration:
helm repo add cilium https://helm.cilium.io/Then install Cilium using Helm:
$ helm install cilium cilium/cilium --version=1.7.2 \
    --set global.tag="v1.7.2" --set global.containerRuntime.integration="containerd" \
    --set global.containerRuntime.socketPath="/var/run/k3s/containerd/containerd.sock" \
    --set global.kubeProxyReplacement="strict" --namespace kube-system
This Helm command executes the following four actions:
- Selecting the v1.7.2 release.
- Configuring Cilium to be able to read information from the containerd runtime along with a custom path for the domain socket implemented by k3s.
- Disabling kube-proxy and using Cilium for address translation
It will take a few minutes for the Cilium agent and operator to become available.
Once we have Cilium up and running, the other pods in the cluster should also
start to transition into the Running state. You should see one Cilium
pod on each node as well as the cilium-operator.

Installing Hubble
Next we will install Hubble, an observability tool which provides deep visibility into network connections, processes and much more thanks to Cilium and eBPF. In order to install Hubble using helm, it's necessary to clone the source repository:
$ cd ..
$ git clone https://github.com/cilium/hubble --branch v0.5
$ cd hubble/install/kubernetes/hubble

$ helm install hubble . --namespace kube-system \
    --set metrics.enabled="{dns:query;ignoreAAAA;destinationContext=pod-short,drop:sourceContext=pod;destinationContext=pod,tcp,flow,port-distribution,icmp,http}" \
    --set ui.enabled=true --set image.tag="v0.5.1"
Here we are setting custom values to:
- enable the Hubble UI;
- define the metrics Hubble will collect;
- select to deploy release v0.5.1.gma
The Hubble daemonset should start a pod on each node, as well as a single pod running the Hubble UI. This process should take a few minutes as the containers are downloaded and started.

Installing MetalLB
MetalLB is a software load balancer which can
expose Kubernetes services to external hosts thanks to a LoadBalancer
service object. We are using MetalLB to work around an existing bug
with multi-node clusters in the K3s service load balancer.
Create the metallb-system namespace:
kubectl create ns metallb-systemThe Helm charts for MetalLB are hosted in the official stable repository. You
can see the list of configured repos with helm repo list. If you do not have
the stable repository configured, add it:
helm repo add stable https://kubernetes-charts.storage.googleapis.com/Next, install MetalLB using Helm:
$ helm install -f https://raw.githubusercontent.com/seanmwinn/cilium-k3s-demo/master/configmap.yaml \
    --namespace metallb-system metallb stable/metallb
We are passing a configmap to the MetalLB which includes the following inline configuration:
configInline:
  peers:
  address-pools:
    - name: default
      protocol: layer2
      addresses:
        - 192.168.80.101-192.168.80.150
This MetalLB configuration will establish an IP address range which will be advertised using Layer2 protocols.
You can check that MetalLB has started up by running:
kubectl get pods -o wide -n metallb-systemYou should see a single controller pod and one speaker pod for each node in the cluster. If you used the default configuration, you should see a total of 3 pods.

Observing Traffic with Hubble
Now that we have a fully working multi-node environment, let's deploy some demo applications which will allow us to observe the powers of eBPF and Cilium using Hubble.
In our scenario, the Alliance is mounting their attack against an Empire base. A fleet of x-wing fighters will infiltrate the security systems and breach the docking area. Teams will then infiltrate the base and activate the internal self-destruct mechanisms to destroy the base using one of the terminals from the control room. This will ensure victory for the Alliance and restore order to the galaxy.
Start off by deploying the applications:
Empire
kubectl apply -f https://raw.githubusercontent.com/seanmwinn/cilium-k3s-demo/master/example-apps/empire.yaml- docking-doors: The docking door control systems. Our heroes need these systems disabled so they can breach the Empire base and transmit the codes.
- janitor-bots: An API for managing janitor-bots. R2D2 has detected a flaw in the janitor bot code which he can exploit to install backdoor program.
- security-api: The central security systems, tightly secured against attacks—or so the empire thinks...
Alliance
kubectl apply -f https://raw.githubusercontent.com/seanmwinn/cilium-k3s-demo/master/example-apps/alliance.yamlWe will also modify the Hubble UI service to be available via a LoadBalancer port using MetalLB:
$ kubectl patch -n kube-system svc/hubble-ui --patch \
    '{"spec": {"type": "LoadBalancer"}}'
Obtain a list of services in the kube-system namespace and determine which IP address was assigned to the hubble-ui service:

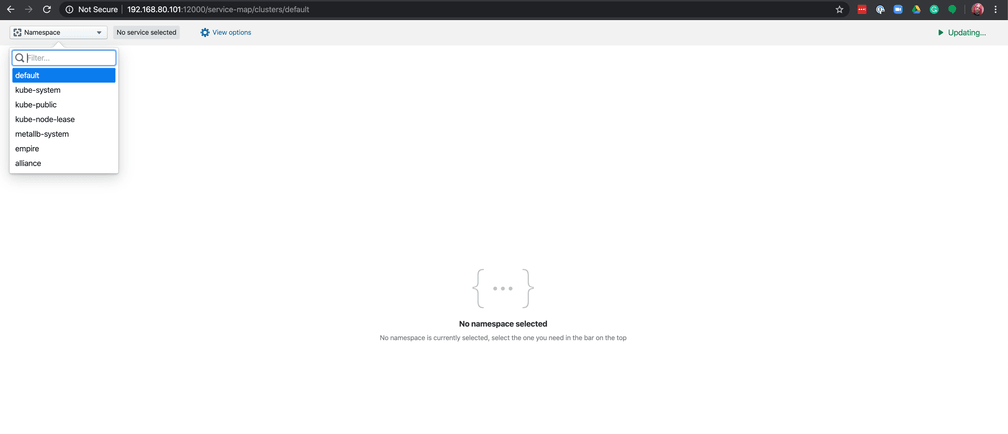
Here we can see the IP address for hubble-ui listed as an External IP and the advertised port, 12000. Using a web broswer, navigate to the IP address of hubble-ui on port 12000 and select the empire namespace in the top left corner:

You should now see a service map of all communications going to or from the empire's various applications in the upper part of the screen, and a list of flows and their forwarding status - either dropped or forwarded in the lower part. Here you can see the failed attempts of the x-wing fleet trying to unlock the docking doors which would allow them to access the empire base.

We can see in the logs that the x-wing-red fleet has been unsuccessful in their attempts to communicate with the security-api control systems.
Fortunately, R2D2 has been able to find a critical security vulnerability in the janitor bots, and he is able to deploy an application into the empire's systems to open a backdoor:
kubectl apply -f https://raw.githubusercontent.com/seanmwinn/cilium-k3s-demo/master/example-apps/r2d2.yamlLet's explore the backdoor application R2D2 was able to install:
---
apiVersion: 'cilium.io/v2'
kind: CiliumNetworkPolicy
metadata:
  name: 'janitor-bots-backdoor'
  namespace: empire
spec:
  endpointSelector:
    matchLabels: {}
  ingress:
    - fromEndpoints:
        - matchLabels:
            k8s:io.kubernetes.pod.namespace: alliance
  egress:
    - toEndpoints:
        - matchLabels:
            name: janitor-bot
R2D2 was able to find a flaw in the empire's systems which allowed him to access the janitor bots. While the empire was thoughtful about security for the docking bay, these droids have access to every system inside the base—including the docking bay doors! He created an application that will allow any communications that come from an alliance ship to access the janitor-bots which should allow the x-wing red fleet to breach the empire base.
R2D2 also sent out the following application update to give the x-wing fleet access to the docking bay security systems via the janitor bots:
$ kubectl patch -n alliance deploy/x-wing-red -p \
    '{"spec": {"template": {"spec": {"containers": [{"name": "x-wing-red", "command":["bash", "-c", "while true; do curl -sS -o /dev/null janitor-bot.empire.svc.cluster.local; sleep $(( ( RANDOM % 10 )  + 1 )); done"]}]}}}}'
This allows the x-wing fleet to land inside the docking bay. Our heroes are able to successfully access the empire base's self-destruct mechanism and make it back out safely!
The galaxy is saved......
Further Reading
We encourage you to read the following guides and explore Hubble's capabilities:
Cleanup
To clean up the environment and delete all virtual machines, from the same folder where the environment was first started:
vagrant destroy -f


