Kubernetes Networking & Load-Balancing with Cilium and F5

Kubernetes Networking with Cilium and F5
This is a guest blog by Howard Hao. Howard is working as a Kubernetes infrastructure SRE for Ect888.com. In this post, Howard will share how Ect888 uses Cilium & F5 to build a scalable load-balancing infrastructure for Ect888's production environment.
Ect888.com was established on January 8, 2015 and is a chinese financial service provider with more than 200 employees serving more than 2 million transactions per day in a Kubernetes environment that is hosting thousands of pods.
Setting up Cilium and F5 to serve traffic to Kubernetes pods
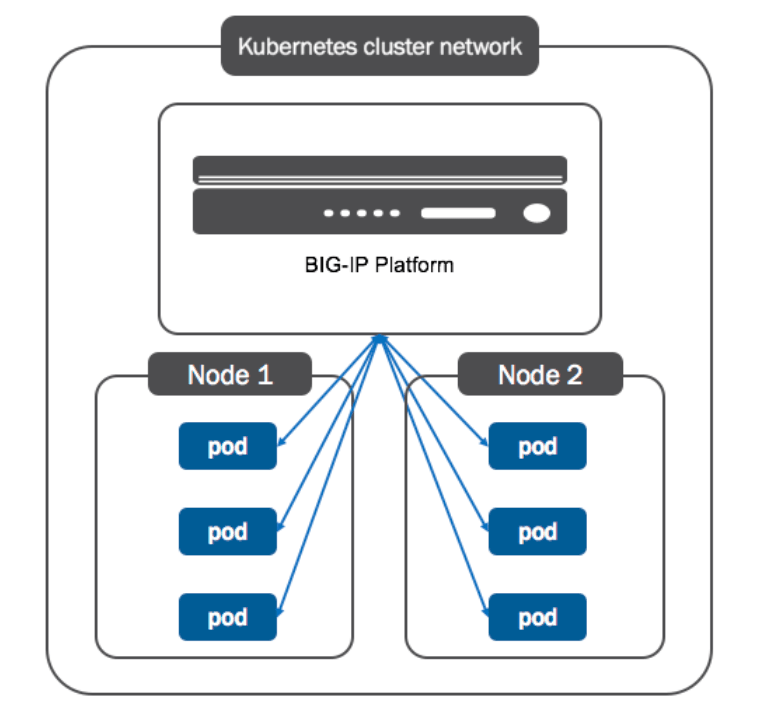
F5 plays a vital role as a load balancer in Ect888.com, all Internet traffic flows through the Global Traffic Manager(GTM), and the Local Traffic Manager(LTM) subsequently. We want the traffic from the LGTM to be forwarded to pod IPs directly so that we can take advantage of LTM's advanced functions such as intelligent caching, extensive connection optimization and management. After a period of struggle, we found that Cilium which is an awesome CNI solution could achieve our goal with BIRD, that aims to develop a fully functional dynamic IP routing daemon and F5 BIG-IP Controller for Kubernetes.
The following summarizes our environment and configuration.
Environment Details
Hardware
- F5: F5-VPR-LTM-B2150
- Switch: Cisco N5K-C5696Q
Software
- OS: CentOS Linux release 7.7.1908
- Kernel: 5.9.3-1.el7.elrepo.x86_64
- F5: BIG-IP 13.3.1.4
- Kubernetes: v1.19.4
- Cilium: 1.8.4
- BIRD: 2.0.7
Prerequisites
- A Kubernetes cluster with CNI enabled (We used kubeadm)
Configuration
Step 1. Deploy Cilium on the Kubernetes cluster with Helm.
$ helm install cilium cilium/cilium --version 1.8.4 \
    --namespace kube-system \
    --set config.ipam=kubernetes \
    --set native-routing-cidr=<no_masquerade_ip_segment> \
    --set global.ipMasqAgent.enabled=true \
    --set global.kubeProxyReplacement=strict \
    --set global.k8sServiceHost=<your_apiserver_ip> \
    --set global.k8sServicePort=6443
All parameters above can be found in values.yaml, and it's noteworthy
that native-routing-cidr allows to explicitly specify the CIDR for
native routing,
which disables IP masquerading executed by Cilium automatically for the traffic sent from Pod to LTM, so that
the traffic can be forwarded to Pods directly.
Step 2. Use BIRD to run BGP between Kubernetes nodes and switch.
Configuration of BIRD:
log syslog all;

router id <Node IP>;

protocol device {
        scan time 10;           # Scan interfaces every 10 seconds
}

# Disable automatically generating direct routes to all network interfaces.
protocol direct {
        disabled;               # Disable by default
}

# Forbid synchronizing BIRD routing tables with the OS kernel.
protocol kernel {
        ipv4 {                    # Connect protocol to IPv4 table by channel
                import none;      # Import to table, default is import all
                export none;      # Export to protocol. default is export none
        };
}

# Static IPv4 routes.
protocol static {
      ipv4;
      route <pod_cidr> via "cilium_host";
}

# BGP peers
protocol bgp uplink0 {
      description "BGP uplink 0";
      local <Node IP> as <BGP AS>;
      neighbor <Switch IP> as <BGP AS>;
      ipv4 {
              import filter {reject;};
              export filter {accept;};
      };
}

protocol bgp uplink1 {
      description "BGP uplink 1";
      local <Node IP> as <BGP AS>;
      neighbor <Switch IP> as <BGP AS>;
      ipv4 {
              import filter {reject;};
              export filter {accept;};
      };
}
Configuration of switch:
router bgp <BGP AS>
  neighbor <Node IP> remote-as <BGP AS>
    update-source loopback0
    address-family ipv4 unicast
Then, the switch should know Pod CIDR.
$ # run the following command on the switch.
$ show ip route bgp
IP Route Table for VRF "default"
'*' denotes best ucast next-hop
'**' denotes best mcast next-hop
'[x/y]' denotes [preference/metric]
'%<string>' in via output denotes VRF <string>

10.16.0.0/24, ubest/mbest: 1/0
    *via 10.1.0.1, [200/0], 3w4d, bgp-64512, internal, tag 64512,
10.16.1.0/24, ubest/mbest: 1/0
    *via 10.1.0.2, [200/0], 3w4d, bgp-64512, internal, tag 64512,
10.16.2.0/24, ubest/mbest: 1/0
    *via 10.1.0.3, [200/0], 3w4d, bgp-64512, internal, tag 64512,
10.16.3.0/24, ubest/mbest: 1/0
    *via 10.1.0.4, [200/0], 3w4d, bgp-64512, internal, tag 64512,
10.16.4.0/24, ubest/mbest: 1/0
    *via 10.1.0.5, [200/0], 3w4d, bgp-64512, internal, tag 64512,
10.16.5.0/24, ubest/mbest: 1/0
    *via 10.1.0.6, [200/0], 3w4d, bgp-64512, internal, tag 64512,
Step 3. Deploy F5 BIG-IP Controller on the Kubernetes cluster.
apiVersion: apps/v1
kind: Deployment
metadata:
  name: k8s-bigip-ctlr-deployment
  namespace: kube-system
spec:
  # DO NOT INCREASE REPLICA COUNT
  replicas: 1
  selector:
    matchLabels:
      app: k8s-bigip-ctlr-deployment
  template:
    metadata:
      name: k8s-bigip-ctlr-deployment
      labels:
        app: k8s-bigip-ctlr-deployment
    spec:
      # Name of the Service Account bound to a Cluster Role with the required
      # permissions
      serviceAccountName: bigip-ctlr
      containers:
        - name: k8s-bigip-ctlr-standby
          image: f5networks/k8s-bigip-ctlr:latest
          env:
            - name: BIGIP_USERNAME
              value: 'F5 BIG-IP USERNAME'
            - name: BIGIP_PASSWORD
              value: 'F5 BIG-IP PASSWORD'
          command: ['/app/bin/k8s-bigip-ctlr']
          args: [
              # See the k8s-bigip-ctlr documentation for information about
              # all config options
              # https://clouddocs.f5.com/products/connectors/k8s-bigip-ctrl/latest
              '--bigip-username=$(BIGIP_USERNAME)',
              '--bigip-password=$(BIGIP_PASSWORD)',
              '--bigip-url=<ip_address-or-hostname>',
              '--bigip-partition=<name_of_partition>',
              '--pool-member-type=cluster',
              '--insecure=true',
            ]
In the deploy.yaml as shown above, the value of
--pool-member-type argument should be cluster, which
is nodeport as default, which integrates the BIG-IP device into
the Kubernetes cluster network.
Note: The above is a simple example, you should of course store the F5 BIG-IP password in a Kubernetes secret and refer to it instead.

Service Exposure
Now we can expose a Service via F5 BIG-IP Container Ingress Services(CIS).
kind: ConfigMap
apiVersion: v1
metadata:
  name: demo-vs
  labels:
    f5type: virtual-server
data:
  schema: 'f5schemadb://bigip-virtual-server_v0.1.7.json'
  data: |
    {
      "virtualServer": {
        "backend": {
          "servicePort": 80,
          "serviceName": "demoservice",
          "healthMonitors": [{
            "interval": 5,
            "protocol": "http",
            "send": "GET /health.html HTTP/1.1\r\nHost:1.1.1.1\r\n\r\n",
            "recv": "server is ok",
            "timeout": 16
          }]
        },
        "frontend": {
          "virtualAddress": {
            "port": 80,
            "bindAddr": "<virtual-server ip>"
          },
          "partition": "K8S",
          "balance": "least-connections-member",
          "mode": "http"
        }
      }
    }
CIS watches the Kubernetes API for specially formatted resources such as the yaml above, and updates the BIG-IP system configuration accordingly. After the ConfigMap is applied, the virtual-server IP should be created automatically, and the Service can be reached via the virtual-server IP.
Summary
Although most people run Kubernetes in a cloud environment, there are still some companies that could only do this in private data centers. If you have F5 devices and want to integrate the BIG-IP device into your Kubernetes cluster network, this article may give you some inspiration.
Finally, thanks for the great work of the Cilium teams, who build this efficient and flexible open source software.


